
If you’re learning how to create a WordPress website, installing a downloaded theme is one of the most important steps to define your site’s design and functionality. Whether you’ve chosen a free theme from WordPress.org or a premium theme from marketplaces like ThemeForest or TemplateMonster, the installation process is straightforward once you know the methods. In this guide, we’ll walk you through how to install a downloaded theme in WordPress using the WordPress dashboard upload, FTP, and cPanel. By following these steps, you’ll be able to upload, activate, and customize your downloaded WordPress theme, giving your website a professional, unique appearance that perfectly fits your vision.
What factors should you consider before installing a downloaded theme on your WordPress site?
Before installing a downloaded theme on your WordPress site, it’s important to check its quality, security, and compatibility. The right theme enhances your site’s design, performance, and SEO while ensuring a smooth user experience.
Key factors to consider:
- Trusted Source: Download only from reliable sites like WordPress.org or TheAlphaBlocks, ThemeForest.
- Compatibility: Make sure it supports your WordPress version and essential plugins.
- Responsive Design: The theme should look perfect on all screen sizes.
- Customization Options: Allow easy design changes to match your brand.
- Speed & Performance: Choose a fast-loading theme for better SEO.
- Regular Updates & Support: Ensure the theme is updated and developer-supported.
- SEO-Friendly Code: Helps improve your site’s search ranking.
- User Reviews: Check feedback from other users for reliability.
Types of Downloaded WordPress Themes
Before installing, it’s helpful to understand where your theme came from. In this guide on How to Install Downloaded Theme in WordPress, we’ll first look at the common sources and file types your theme might come in before moving on to the installation steps.
- Free Themes from WordPress.org
These are free themes downloaded from sites like ThemeGrill, Astra, or OceanWP. - Premium (Paid) Themes:
Purchased from marketplaces like thealphablocks, ThemeForest or Elegant Themes. They often include more customization options and customer support. - Custom Developer Themes:
Designed by a web developer specifically for your website.
No matter where your theme came from, it usually arrives as a .zip file — which is exactly what you’ll need to upload to WordPress.
Before You Install: Preparation Checklist
Before diving into installation, make sure you have everything ready:
1. Theme ZIP File
Locate your downloaded theme file (e.g., mytheme.zip). Do not extract it before uploading.
2. Active WordPress Installation
Log into your WordPress dashboard at yourdomain.com/wp-admin.
3. Backup Your Site (Optional but Recommended)
If you’re replacing an existing theme, always back up your website using plugins like UpdraftPlus or Jetpack.
4. Verify Theme Requirements
Before installing a downloaded WordPress theme, follow these steps to ensure compatibility and smooth performance:
- Check WordPress Version Compatibility – Make sure the theme supports your current WordPress version to avoid layout or functionality issues.
- Review PHP Version Requirements – Some themes require newer PHP versions (like 7.4 or higher). Verify this with your hosting provider.
- Confirm Required Plugins – Look for any plugins that must be installed for the theme to work properly, such as Elementor or WooCommerce.
- Read Theme Documentation – Check the developer’s instructions for installation, setup, and customization tips.
- Verify Browser and Device Compatibility – Ensure the theme is responsive and performs well on all major browsers and devices.
- Check for Regular Updates – Choose a theme that receives frequent updates to maintain security and compatibility with WordPress core updates.
Methods How to Install Downloaded Theme in WordPress
There are three simple methods to install a downloaded theme in WordPress. You can upload the theme directly through the WordPress Dashboard, which is the easiest option for beginners. Alternatively, you can install the theme via FTP if you prefer manual control or face upload restrictions. Lastly, you can use cPanel’s File Manager to upload and extract your theme files directly on the server. Each method helps you activate your new theme safely and customize your website’s appearance with ease.
Method 1: Install a Downloaded Theme via WordPress Dashboard (Recommended)
This is the easiest and most popular method, especially for beginners.
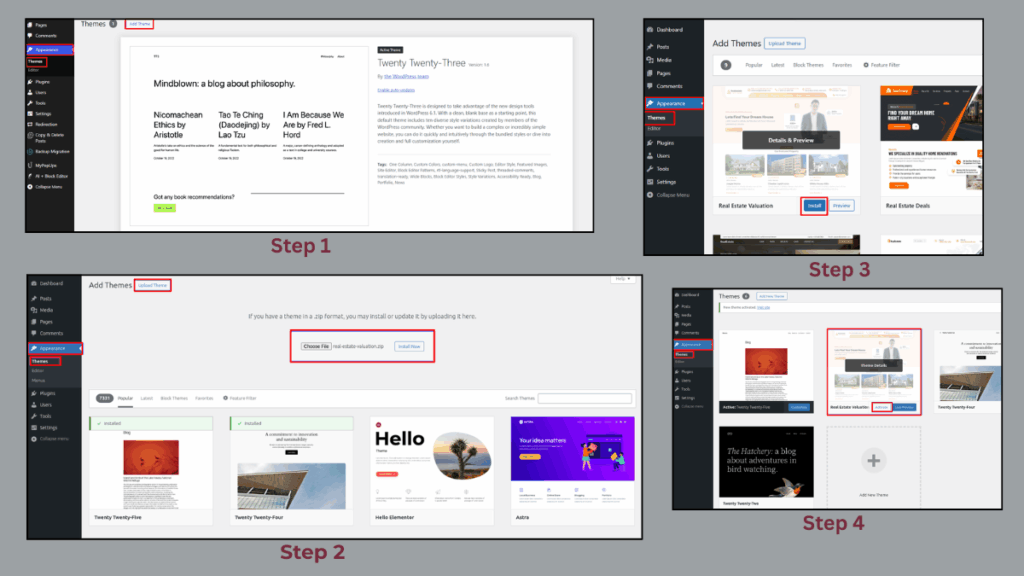
Step 1: Log in to Your WordPress Dashboard
Go to your browser and log in to your WordPress admin panel. The default link is:
Step 2: Go to Appearance → Themes
In the left-hand sidebar, navigate to:
Appearance → Themes → Add New
Step 3: Upload Your Downloaded Theme
At the top of the page, click “Upload Theme.”
Then click the “Choose File” button and select your .zip theme file from your computer.
Step 4: Click “Install Now”
Once selected, click “Install Now.” WordPress will upload and unpack the theme automatically.
Step 5: Activate the Theme
After installation, you’ll see an option to Activate the theme.
Click Activate, and your new theme will go live instantly.
Congratulations! You’ve successfully installed a downloaded WordPress theme using the dashboard.
Method 2: Install Downloaded Theme Using FTP (File Transfer Protocol)
If your theme is too large to upload through the dashboard or you face upload errors, you can install it manually using FTP.
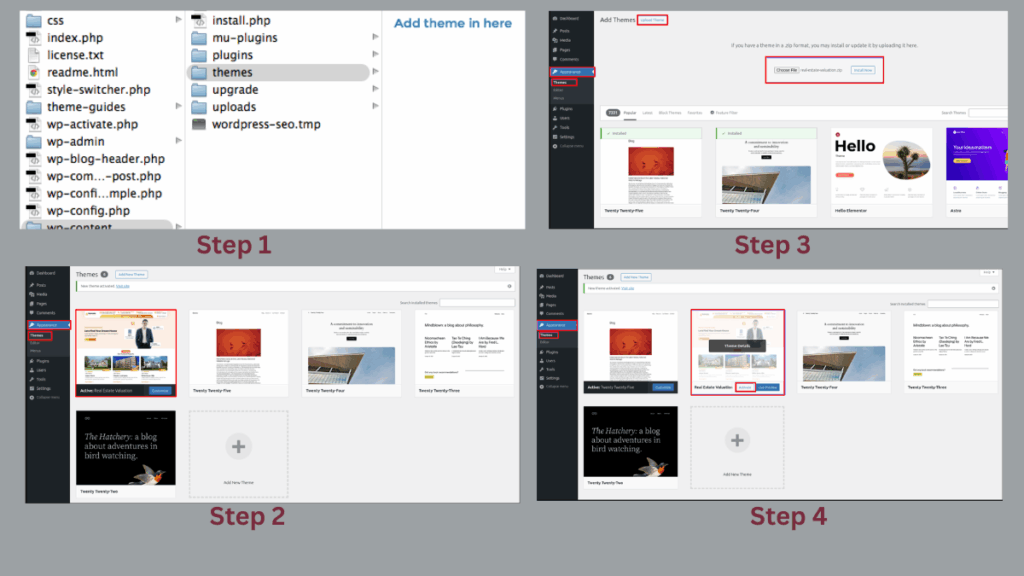
Step 1: Extract the Theme ZIP File
Extract the downloaded .zip file on your computer. You’ll get a folder containing all theme files.
Step 2: Connect to Your Site Using FTP
Use an FTP client like FileZilla or Cyberduck.
Enter your FTP credentials (host, username, password, and port). You can find these in your hosting account or cPanel.
Step 3: Navigate to the Theme Directory
In your website’s file structure, go to:
/wp-content/themes/Step 4: Upload the Theme Folder
Upload the extracted theme folder (not the zip file) into the /themes/ directory.
Step 5: Activate the Theme in WordPress
Once uploaded, return to your WordPress dashboard → Appearance → Themes.
You’ll see your new theme listed. Click Activate to apply it.
Method 3: Install Downloaded Theme Using cPanel File Manager
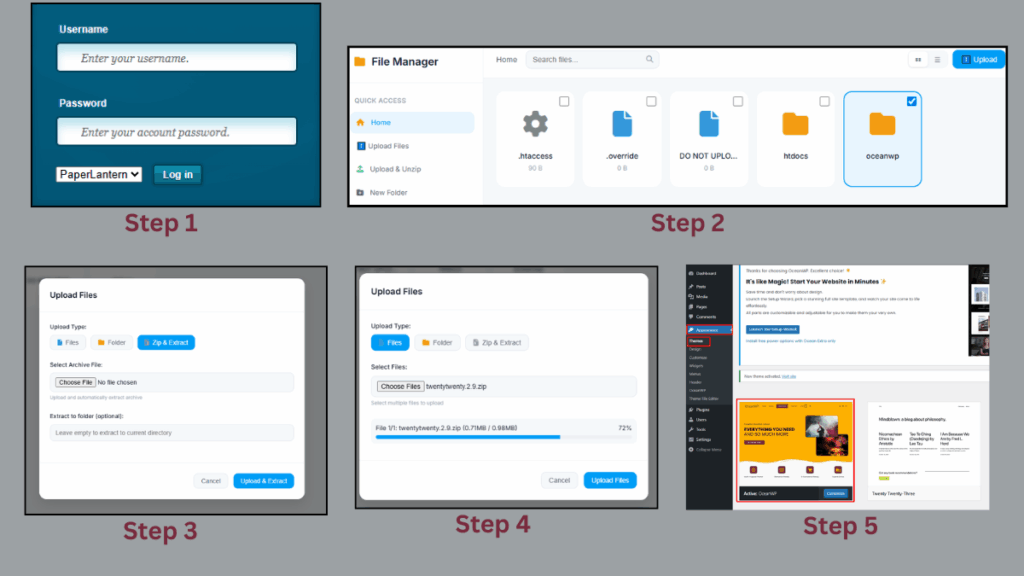
If FTP sounds complicated, you can also use your hosting control panel (cPanel) to upload the theme.
Step 1: Log in to cPanel
Access your hosting account and open cPanel.
Step 2: Go to File Manager
Click on File Manager → navigate to:
public_html/wp-content/themes/Step 3: Upload the Theme ZIP File
Click Upload, then choose your downloaded .zip theme file.
Step 4: Extract the Theme
After uploading, right-click on the ZIP file and select Extract.
Step 5: Activate the Theme
Go back to your WordPress admin dashboard → Appearance → Themes, and click Activate under your new theme.
How to Check If Your Theme Is Installed Correctly
After installation, visit your website’s homepage. You should see the new design applied.
If you don’t, go to:
Appearance → Themes → Active Theme
Make sure your downloaded theme is active.
You can also check your site’s frontend and inspect for missing styles or layout issues.
Common Issues and How to Fix Them
Sometimes, installing a downloaded theme can lead to small errors. Here’s how to handle them:
1.The package could not be installed. The theme is missing the style.css stylesheet.
Solution:
Make sure you uploaded the correct theme ZIP file. Many premium themes include multiple ZIPs — you must upload the installable theme ZIP, not the full package with documentation and demo files.
2. Are you sure you want to do this? Error
Solution:
This usually happens if the file size exceeds your server’s upload limit.
To fix:
- Increase PHP upload limit via cPanel or
- Use FTP upload instead.
3. Broken Layout or Missing Images
Solution:
Some premium themes require demo content import.
Check your theme’s documentation and install the recommended plugins and demo data to make it look like the preview.
4. Slow Loading After Activation
Solution:
Clear your browser cache and install a caching plugin like WP Super Cache or LiteSpeed Cache.
Post-Installation Steps: Customizing Your Theme
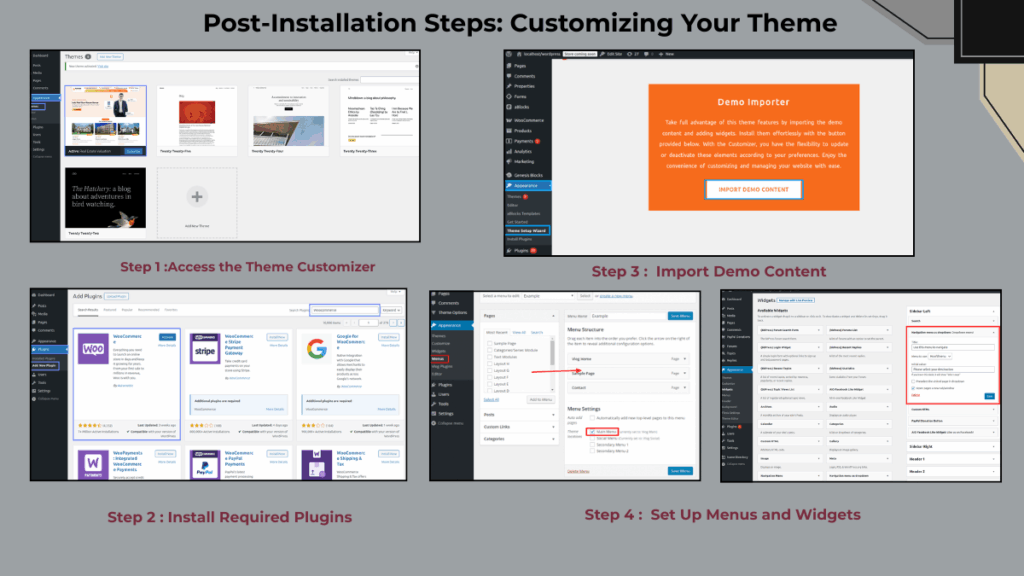
Once your downloaded theme is active, it’s time to personalize it.
1. Access the Theme Customizer
After completing the steps in How to Install Downloaded Theme in WordPress, the next step is customizing your site’s look and feel.
Go to:
Appearance → Customize
Here, you can easily modify:
- Site logo and title
- Colors and fonts
- Homepage layout
- Header and footer styles
2. Install Required Plugins
Most themes require additional plugins like Elementor, WooCommerce, or Contact Form 7 to enable specific features. Once you’ve installed your theme, you’ll see a prompt in your WordPress dashboard to install and activate these plugins.
If you’re unsure how to proceed, check out our detailed guide on How To Add Plugins To WordPress to learn the step-by-step process safely.
3. Import Demo Content (Optional)
Many WordPress themes include demo content to help you get started quickly. Use the One Click Demo Import tool (if available) to make your site look just like the demo version. This is especially helpful after you complete How to Install Downloaded Theme in WordPress, as it gives you a professional-looking layout instantly.
4. Set Up Menus and Widgets
Once your theme is active, set up your site navigation and widgets:
- Appearance → Menus
- Appearance → Widgets
Add your main navigation menus, footer widgets, and sidebar elements to make your website user-friendly and well-organized.
5. Test Responsiveness
Finally, preview your website on mobile, tablet, and desktop devices. Ensure your design looks great across all screen sizes and functions smoothly—an essential step after completing How to Install Downloaded Theme in WordPress successfully.
Best Practices When Using Downloaded Themes
1. Download Only from Trusted Sources
Avoid free theme sites that look suspicious — they may include malicious code. Always use verified sources like:
- The Alpha Blocks
- WordPress.org
- ThemeForest
- Astra / OceanWP official sites
2. Keep Themes Updated
Regularly update your theme to get security patches and compatibility fixes.
3. Use a Child Theme for Customization
If you plan to edit your theme files, create a child theme to prevent losing changes during updates.
4. Test Before Going Live
Use a staging site to test new themes before applying them on your main website.
5. Backup Before Switching Themes
Always back up your site using a reliable plugin before changing themes.
SEO Tips for a Newly Installed Theme
After installing your theme, optimize it for search engines:
- Ensure your theme is SEO-friendly (uses clean code and schema markup).
- Use Yoast SEO or Rank Math plugins for optimization.
- Compress images with Smush or ShortPixel.
- Improve speed with caching and CDN integration.
- Make sure your theme supports mobile responsiveness, as Google ranks mobile-first.
Conclusion
In conclusion, learning How to Install Downloaded Theme in WordPress is one of the simplest and most effective ways to transform your website’s appearance instantly. Installing a Free WordPress themes through the WordPress dashboard, FTP, or cPanel is quick and easy, even for beginners. Always make sure to download your theme from trusted sources like WordPress.org to maintain security and compatibility. Once installed, you can customize your theme’s layout, colors, and features to match your brand identity. A properly installed and optimized free WordPress theme not only enhances your site’s visual appeal but also improves performance, SEO, and user experience, helping your website stand out effortlessly.
Frequently Asked Questions (FAQs)
A WordPress theme controls your website’s layout, design, and style. It determines how your content is displayed to visitors.
Your theme should be in .zip format before uploading to WordPress. If it’s extracted into a folder, compress it again into a .zip file for a smooth installation.
You can use a staging site provided by your web host or a local WordPress installation to test the theme. This way, your live site remains unaffected.
Check the theme’s details on the download page or in the documentation. Always ensure the theme is compatible with your current WordPress version and PHP version.
Yes! After learning how to install downloaded theme in WordPress, you can customize it using the WordPress Customizer, page builders, or by creating a child theme to edit CSS and code safely.
yes, you can edit the code using the Theme Editor or via FTP, but it’s highly recommended to use a child theme to avoid losing changes during updates.