
A smooth and responsive website ensures an exceptional user experience, and one effective way to maintain this is by clearing cached data. This Step-by-Step Guide: How to Purge Cache in WordPress will help you understand the concept, methods, and importance of cache purging for optimal website performance. Cache stores temporary data that allows websites to load faster for returning visitors. However, outdated cache files can prevent new updates from showing up, leading to performance issues and display errors. Whether you use WordPress Block Themes or classic themes, knowing how to manage your cache is vital to ensure your site runs efficiently. This guide will cover all cache types, browser, server, plugin, and CDN, and explain practical steps to purge them effectively. You’ll also learn key tips to manage cache and avoid common mistakes, helping you maintain both website speed and accuracy without compromising your design or user experience.
Understanding WordPress Cache
Cache refers to the temporary storage of website data, such as images, CSS, and HTML files, designed to improve site speed and user experience. When visitors revisit a page, cached files load faster since they’re retrieved from memory instead of the server. This reduces bandwidth usage and speeds up page delivery. However, over time, cached data may become outdated, causing website changes not to appear immediately. Understanding how cache works is crucial to maintaining site accuracy and performance. Proper cache management ensures visitors always see the most up-to-date version of your website without unnecessary lag or loading issues. Knowing how to purge cache in WordPress helps you ensure that outdated files are cleared so your website always displays the latest updates instantly.
Note: Explore a wide range of Free WordPress Themes to create a stunning, professional-looking website without spending a dime.
Types of Cache in WordPress
Browser Cache
Browser cache stores website resources like images, scripts, and stylesheets locally on users’ devices. When a visitor revisits your site, the browser retrieves these files from local storage instead of downloading them again, speeding up load times. However, outdated browser cache can prevent new updates from appearing correctly.
Server Cache
Server cache stores website data on the hosting server to reduce database queries and speed up content delivery. It improves response time and reduces load on the server. However, when you make major updates, it’s necessary to purge the server cache so visitors can see the latest changes immediately.
Plugin Cache
Caching plugins like W3 Total Cache and WP Super Cache store pre-generated HTML pages to enhance performance. These plugins reduce database load and improve site speed. However, when changes are made to design or content, you must clear plugin cache to ensure the latest version displays properly on all devices.
CDN Cache
Content Delivery Networks (CDNs) store cached copies of your website across multiple global servers to enhance load speed for users worldwide. While this improves accessibility, old cached files may delay updates. Purging CDN cache ensures that global visitors always access the latest and most accurate version of your site.
Note: Learn how to add plugins to WordPress to enhance your website’s functionality and customize it with powerful new features.
Signs You Need to Purge Cache
If your website starts showing outdated content, loading slowly, or failing to reflect recent updates, it may be time to clear stored data. Understanding the signs you need to purge cache helps you maintain smooth performance and accurate page display. By knowing how to purge cache in WordPress, you can quickly refresh your site and ensure visitors always see the latest version without any glitches.
- Website Updates Not Showing: If recent content, images, or design changes aren’t visible, your cache likely holds outdated data. Purging cache ensures that visitors and admins see the most current version of your site without delays.
- Slow Loading Pages: When your site starts loading slower than usual despite optimization, cached data might be corrupted or outdated. Clearing the cache refreshes stored files and improves overall website performance and responsiveness.
- Layout or Functionality Errors: If your website layout looks broken, or scripts and buttons don’t work correctly after updates, it’s a clear sign you need to purge the cache to reload all updated resources.
- Inconsistent Display Across Devices: When your website appears differently on mobile and desktop, cached versions might vary. Purging cache ensures uniform display and functionality across all devices and browsers.
Methods to Purge Cache in WordPress
When you understand how to purge cache in WordPress, you can quickly clear outdated files, fix display issues, and maintain optimal performance for your visitors. From plugin-based solutions to hosting-level tools, knowing the right approach helps you manage your website efficiently.
Purging Cache via Caching Plugins
W3 Total Cache: Steps to Clear Cache
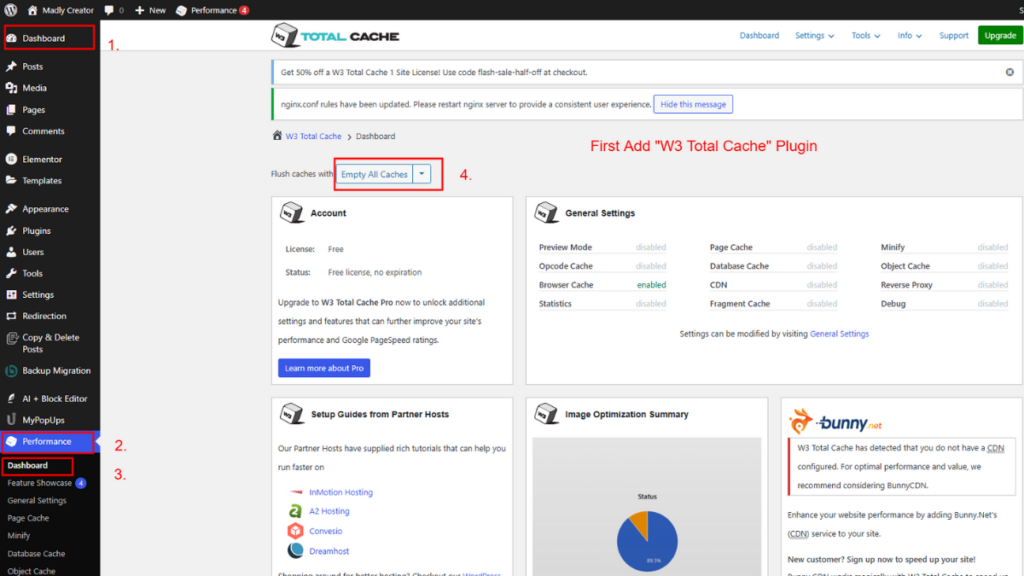
Follow these steps to purge cache using W3 Total Cache:
- Log in to your WordPress dashboard.
- Navigate to Performance → Dashboard.
- Click the “Empty All Caches” button to remove all cached content instantly.
- To clear specific caches, go to Performance → Page Cache, Database Cache, or Object Cache, and select “Empty Cache.”
- Refresh your website to confirm that the latest updates are now visible.
These steps ensure your website reflects new changes immediately.
WP Super Cache: Steps to Clear Cache
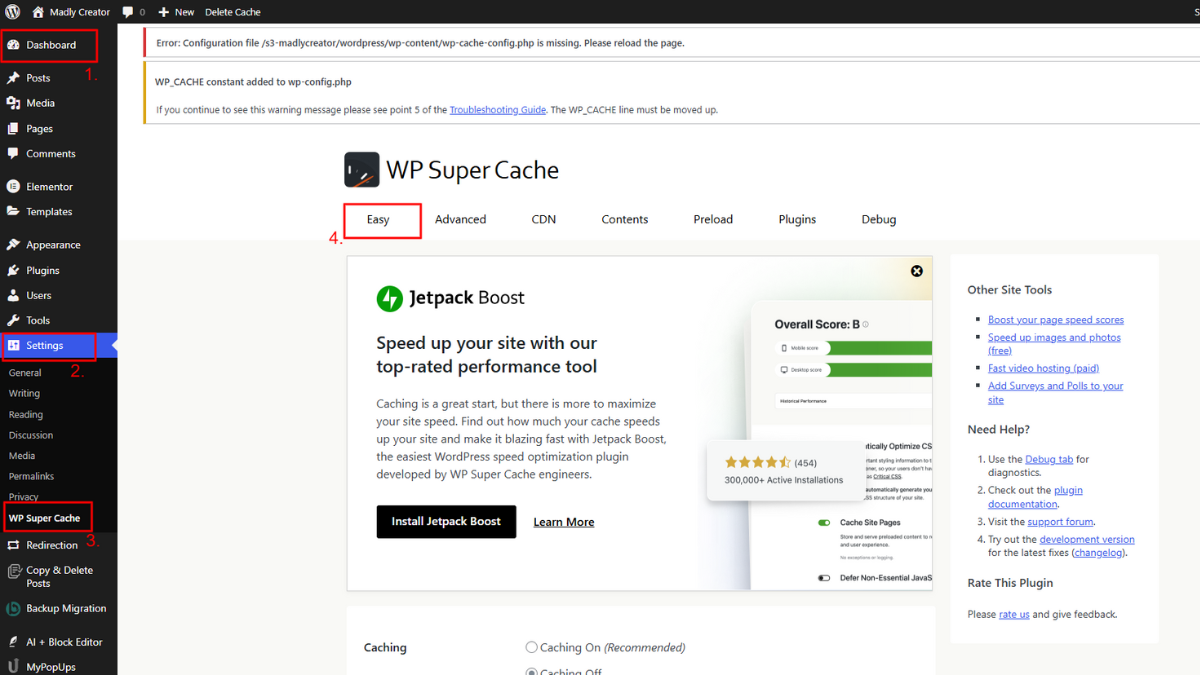
Follow these steps to purge cache using WP Super Cache:
- Log in to your WordPress admin dashboard.
- Go to Settings → WP Super Cache.
- Under the Easy tab, click the “Delete Cache” button to clear all cached files instantly.
- To delete specific cached pages, open the Contents tab and select “Delete Cache” next to individual URLs.
- Refresh your website to ensure your latest updates appear correctly.
These steps help maintain an updated and fast-loading website.
WP Rocket: Steps to Clear Cache
Follow these steps to purge cache using WP Rocket:
- Log in to your WordPress dashboard.
- Navigate to Settings → WP Rocket.
- On the Dashboard tab, click the “Clear Cache” button to remove all cached files.
- To clear the cache for a specific page, go to that page in WordPress and select “Clear this cache” from the admin toolbar.
- Refresh your site to verify that the latest updates are visible.
These steps ensure smooth performance and accurate content display.
Purging Cache via Hosting Providers
Built-in Caching in Hosting Services
Many top hosting providers like SiteGround, Bluehost, and WP Engine include built-in caching tools. These caches improve performance but sometimes store outdated data. You can usually clear this cache from your hosting dashboard. Access your hosting control panel, locate caching tools like “Dynamic Cache” or “Object Cache,” and click “Flush Cache.” Doing this ensures that your website reflects recent updates immediately, preventing users from seeing outdated content or layouts.
Steps to Clear Server Cache through Hosting Dashboard
Log into your hosting account and open your website’s management panel. Look for “Caching” or “Performance Tools.” Depending on your host, you might see options like “Purge Cache” or “Flush Cache.” Click the relevant button to remove stored files. If your host uses multiple cache layers (e.g., Varnish or Redis), ensure you clear each level. Once done, refresh your website to confirm that all new changes appear correctly.
Note: If you want your website to load faster and perform reliably, choosing the Best Web Hosting for WordPress is the first step toward building a successful online presence.
Purging Browser Cache

How to Clear Cache in Chrome, Firefox, and Safari
In Chrome, open Settings > Privacy and Security > Clear Browsing Data. Select “Cached Images and Files” and confirm.
In Firefox, go to Settings > Privacy > Cookies and Site Data and click “Clear Data.”
In Safari, open Preferences > Advanced and select “Empty Caches” from the Develop menu. Clearing browser cache helps load the newest site files and removes any stored outdated data that may cause display inconsistencies.
Why Browser Cache Matters for Previewing Changes
Browser cache temporarily stores website assets to speed up browsing. However, when you make edits or design changes, cached data can cause you to see older versions. Clearing the browser cache ensures you’re viewing the current site layout, scripts, and images as they appear live. This step is crucial for developers, designers, and content creators testing updates or troubleshooting layout inconsistencies in their WordPress website.
Purging CDN Cache (If Using CDN)
Brief Explanation of CDN
A Content Delivery Network (CDN) like Cloudflare or KeyCDN speeds up website loading by distributing cached versions of your site across multiple global servers. This allows visitors to access your content from the nearest data center. However, CDN caches can sometimes store outdated files, causing older versions to appear even after updates. Regularly purging your CDN cache ensures that users worldwide always access the most current version of your website.
Steps to Clear Cache from CDN Dashboard
Log in to your CDN account (e.g., Cloudflare or KeyCDN). Navigate to the “Caching” section and select “Purge Everything” to clear all cached resources. Alternatively, you can purge cache for individual files or URLs if you’ve made limited changes. Wait a few minutes for the purge to propagate across all global servers. Refresh your website afterward to confirm that the updated content is now visible to users worldwide.
Tips to Manage Cache Efficiently
- Enable Automatic Cache Clearing: Configure caching plugins to clear cache automatically when you update or publish content. This saves time and ensures content accuracy.
- Use Reliable Caching Plugins: Choose well-known plugins that support smart caching and automatic purging. This avoids performance conflicts.
- Combine CDN with Plugin Cache: This hybrid approach enhances speed globally while maintaining real-time updates.
- Monitor Site Performance Regularly: Use tools like GTmetrix or Google PageSpeed Insights to detect caching issues and resolve them promptly.
- Avoid Over-Caching: Excessive caching can prevent updates from displaying properly. Maintain a balance between performance and content freshness.
Common Mistakes to Avoid When Purging Cache
Purging your website’s cache is essential for keeping your pages updated, but doing it incorrectly can lead to performance issues or missing content. Many users jump into the process without fully understanding how to purge cache in WordPress, which often results in unnecessary errors. By knowing the common mistakes to avoid, you can ensure smooth cache management and maintain your site’s speed, accuracy, and overall functionality.
- Clearing cache too frequently can slow performance by forcing data reloads.
- Forgetting to purge CDN cache leads to outdated content across regions.
- Ignoring browser cache while testing updates causes inconsistent previews.
- Deleting cache without backups may cause temporary site instability.
- Using multiple caching plugins simultaneously creates conflicts and errors.
Conclusion
Learning How to Purge Cache in WordPress is crucial for maintaining site speed, performance, and accurate display of updates. Whether you’re using WordPress Block Themes or classic designs, understanding when and how to clear cache ensures that your website runs smoothly and efficiently. From browser and plugin cache to CDN and server cache, each plays a unique role in your site’s performance. Regularly purging these caches prevents old data from slowing your website or showing outdated content. For those building multiple sites, the WordPress Theme Bundle offers optimized themes that complement your cache management strategy perfectly, enhancing both speed and design consistency. Keep your site fresh, fast, and responsive by following these cache management practices and ensuring every visitor experiences the most accurate version of your WordPress website.
Frequently Asked Questions (FAQs)
1. What is the purpose of purging cache in WordPress?
Purging cache removes outdated temporary files so that your visitors always see the latest version of your site content and design updates.
2. How often should I purge cache in WordPress?
You should purge cache whenever you make major updates to your theme, plugins, or content, ensuring all changes reflect immediately on your website.
3. Can I purge cache without plugins?
Yes, you can clear cache through your hosting provider’s control panel or CDN dashboard if plugins aren’t used on your WordPress site.
4. Does purging the cache affect website speed?
Temporarily, yes, it might slightly slow down the site initially as new cache builds. However, performance improves once fresh data is re-cached.
5. What’s the best tool for managing WordPress cache?
Tools like W3 Total Cache, WP Super Cache, or WP Rocket are reliable for efficiently managing and automating cache purging in WordPress.